Objectives
This guide provides instructions on how to use AWS IAM Identity Center for interacting with S3 buckets within the FlowWest AWS Organization. By the end of this guide, you will be able to:
- Access all S3 buckets across different accounts.
- Create new S3 buckets.
- Install and use a GUI for managing S3 buckets.
- Use the AWS CLI to interact with S3 buckets.
- Connect other frontends to S3 buckets.
Access All Buckets
To ensure that you can access all S3 buckets, follow these steps:
-
Log In to AWS:
- Visit the FlowWest AWS Login page.
- Enter your credentials to log in.
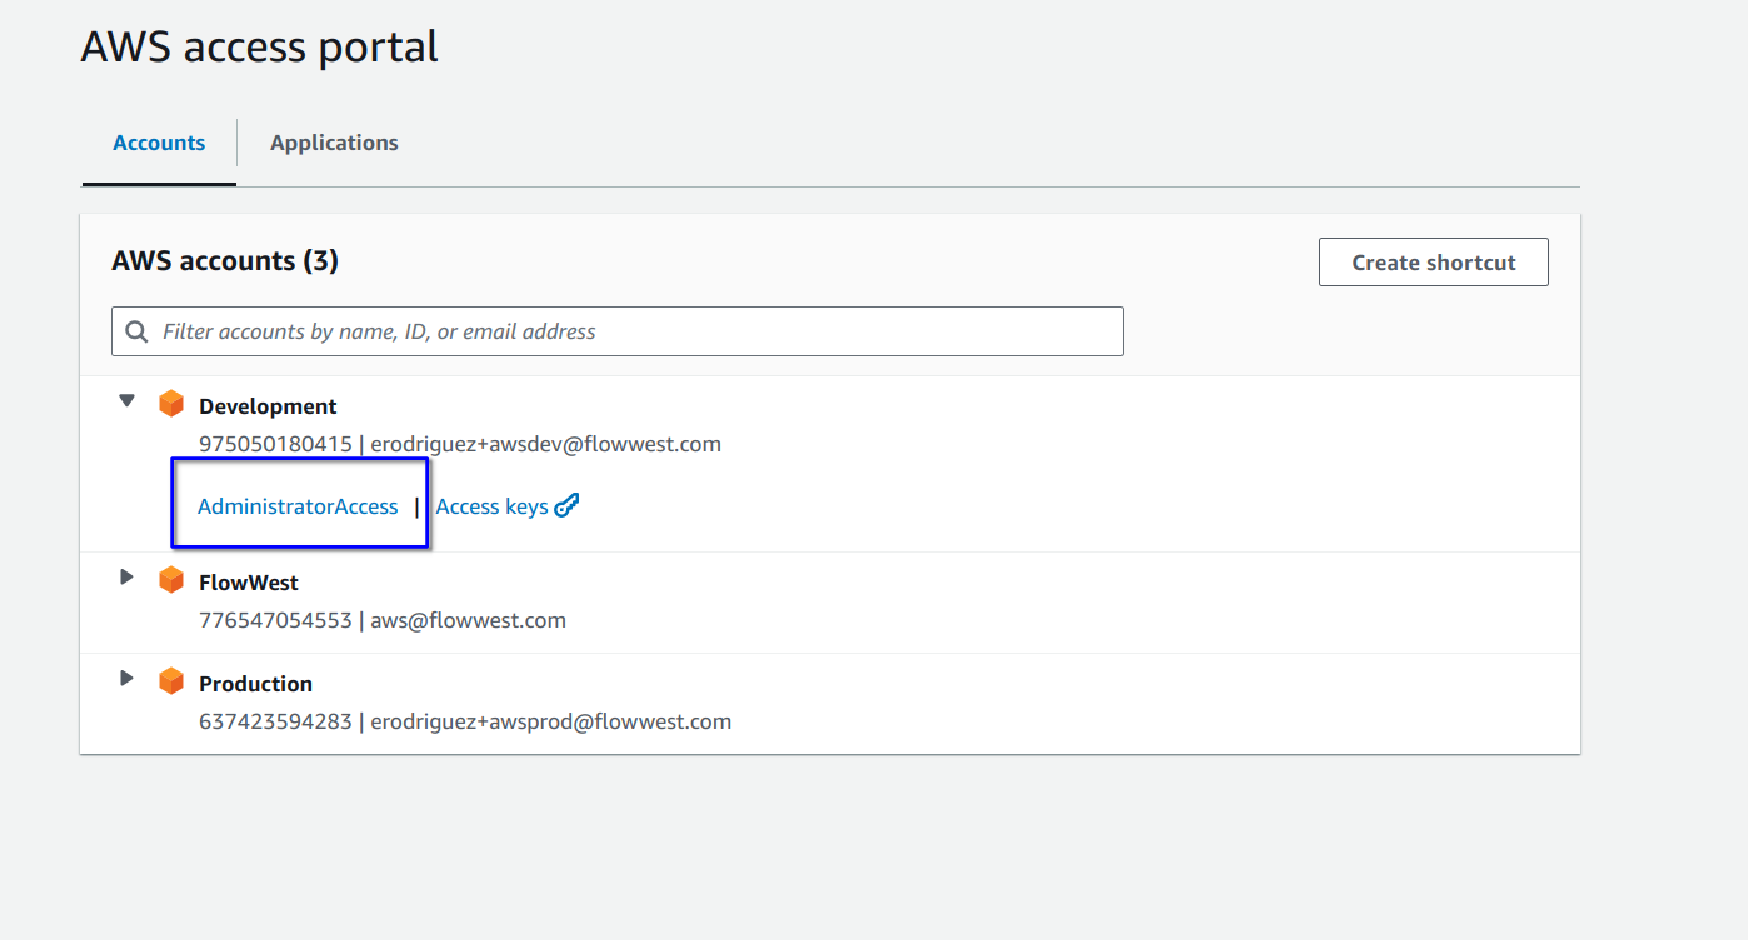
- Once logged in, you will be presented with the accounts you have access to within the organization.
-
Select an Account:
-
Typically, you will perform most of your work within the “Development” or “FlowWest” account.
-
Select the relevant account to proceed, in this case lets select “FlowWest” by clicking on the access level available to you.

-
-
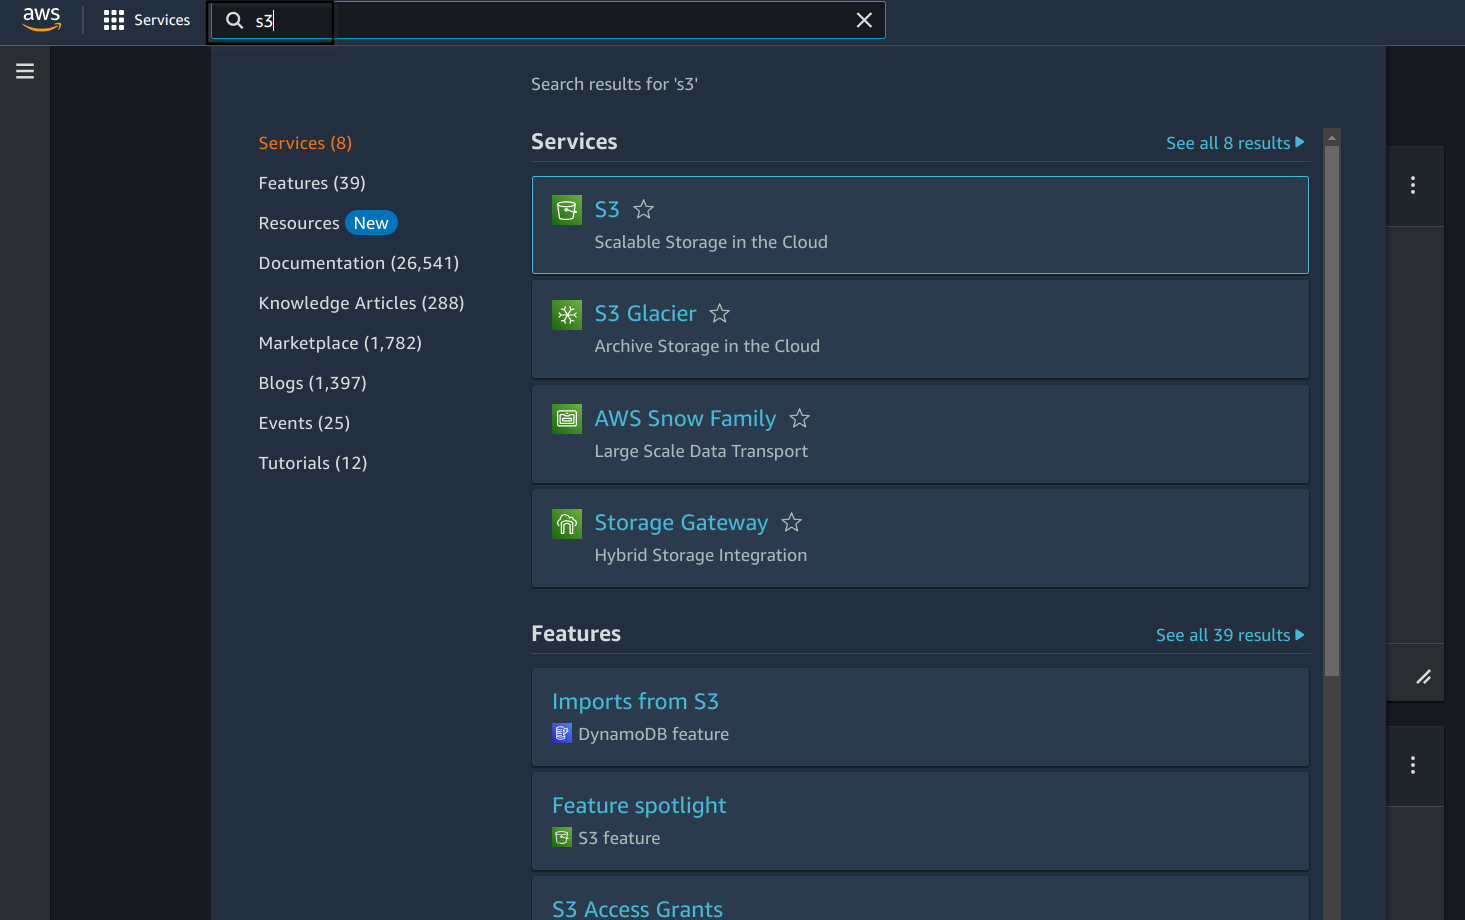
You should now be presented with the aws console populated with services that the access level permits for you. One of these will be AWS S3, search for it in the search bar and select it.

-
At this point you should see a long list of buckets.
Install a GUI for Working with S3
The console can be slow, and has limitations when it comes do downloading entire buckets at a time, for this reason it’s a good idea to install a user interface for interacting with S3 (we will go over using the CLI for this as well later on). There are a few options, but the most maintained software available at the moment is Cyberduck. Download the version you need either Windows or Mac and proceed to install.
Granting Cyberduck Access
SECTION TO BE COMPLETED
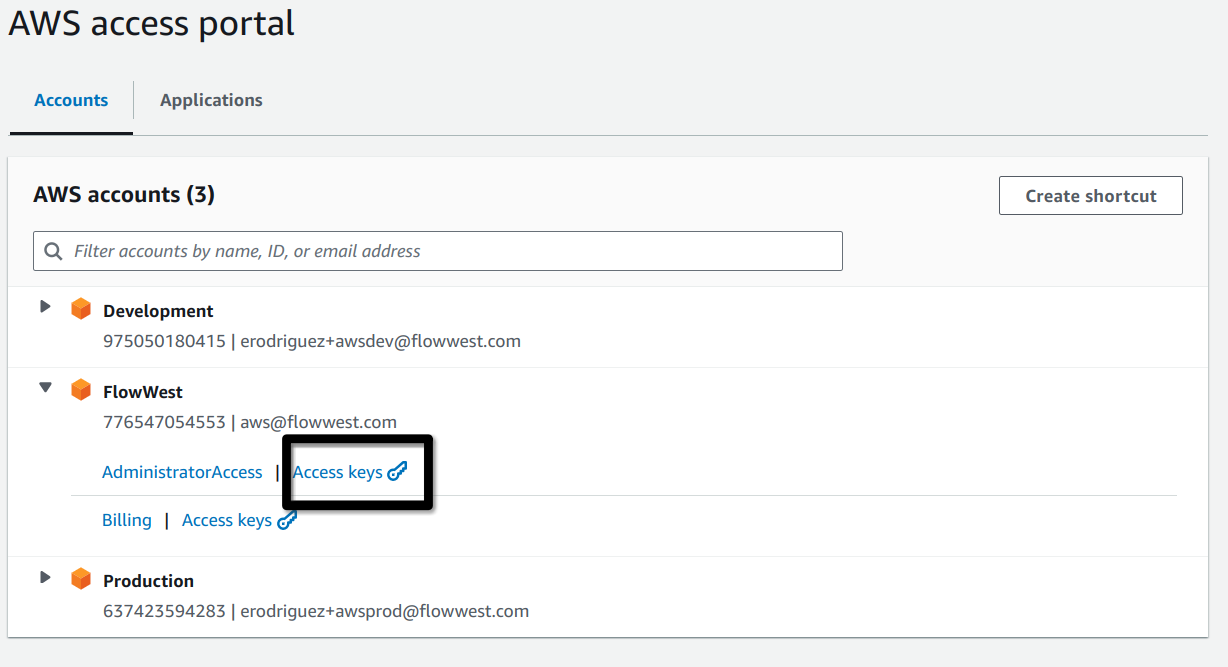
After installation is done we need to provide Cyberduck with access to the FlowWest S3 buckets. To do this we will use the “Access Keys” at the portal login. After navigating to the portal page, click the “Access Keys” for the FlowWest account.
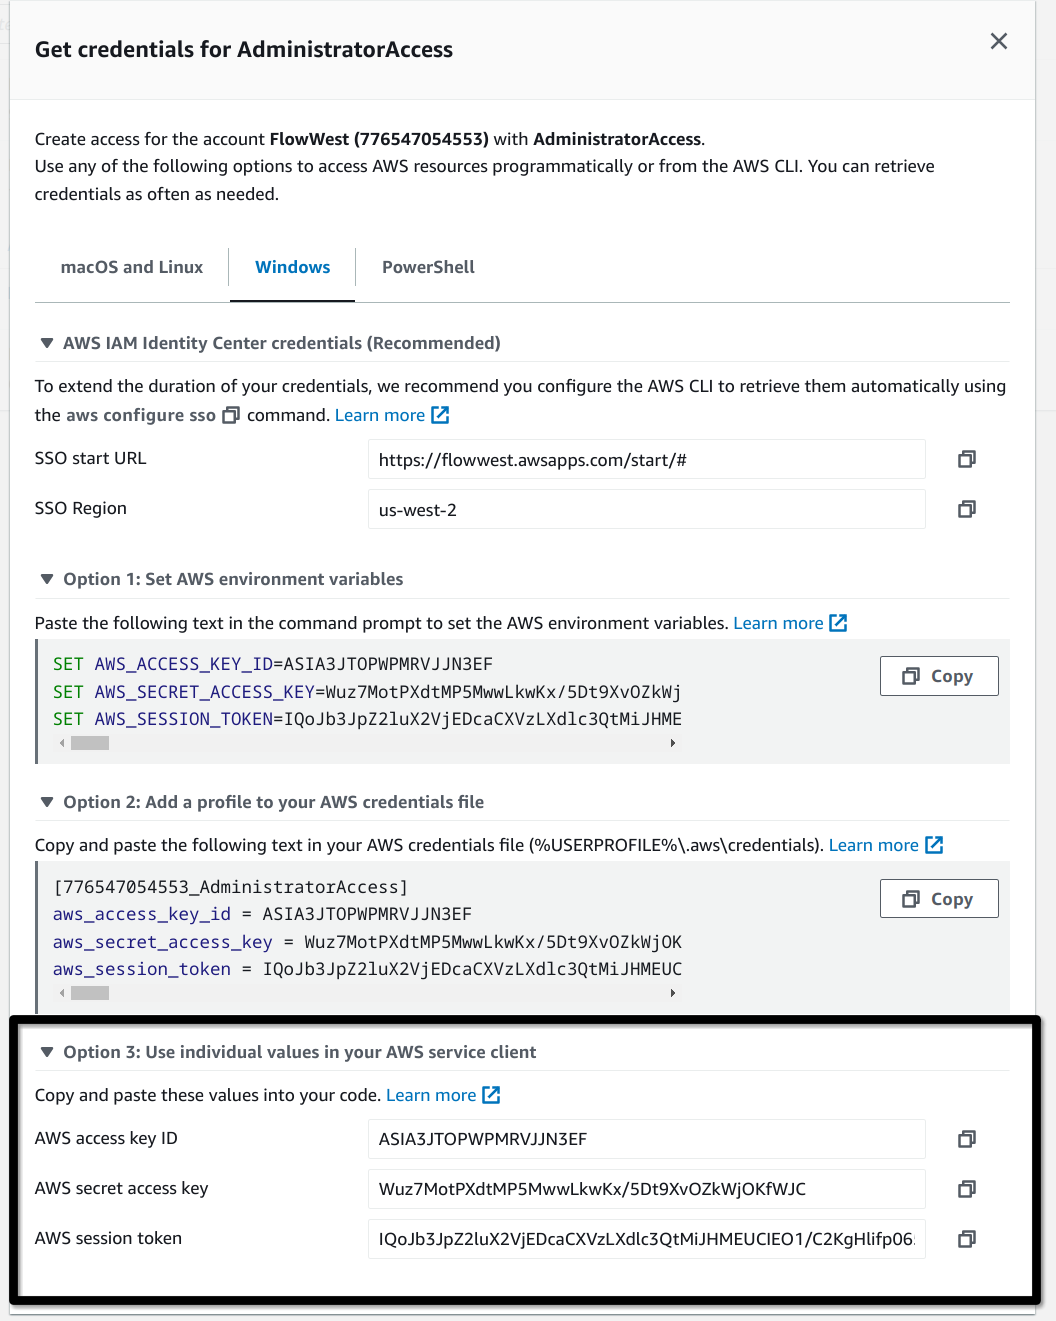
You are then presented with a few different ways to get the access keys, we will be using option 3 for setting up Cyberduck.
Set up AWS CLI
Another way to interact with S3 apart from the console is the AWS CLI, it of course does way more than just allow you to interface with S3, but for now we will focus on its S3 commands.
Install AWS CLI
Installing AWS CLI on Windows:
- Download the AWS CLI MSI Installer:
- Go to the AWS CLI download page and download the AWS CLI MSI installer for Windows (64-bit).
- Run the Installer:
-
- Run the downloaded MSI installer and follow the installation prompts.
-
- Verify the Installation:
- Open a new command prompt window.
- Run the command
aws --versionto confirm the installation
Installing AWS CLI on Mac OS
- Download the AWS CLI Package:
- Download the AWS CLI package for macOS from the AWS CLI download page.
- Install the Package:
- Open a terminal and run the following commands to install the AWS CLI
curl "https://awscli.amazonaws.com/AWSCLIV2.pkg" -o "AWSCLIV2.pkg"sudo installer -pkg AWSCLIV2.pkg -target /
- Open a terminal and run the following commands to install the AWS CLI
- Verify the Installation:
- Run the command
aws --versionto confirm the installation:aws --version
- Run the command
Configure CLI
Next we will want to configure the cli so that it is linked to our organization’s account, to do this we do the following based on your operating system.
Windows
Create a folder on username folder called .aws it should looks like: C:\Users\USERNAME\.aws in this folder create a file called config
Mac
Create a folder and file at ~/.aws/config
Now open the config on your machine either Windows or Mac and paste the following
[profile flowwest]
sso_session = sso-session
sso_account_id = ACCOUNT_ID_HERE
sso_role_name = YOUR_ROLE_HERE
region = us-west-2
output = text

[default]
sso_session = sso-session
sso_account_id = ACCOUNT_ID_HERE
sso_role_name = YOUR_ROLE_HERE
region = us-west-2
output = text

[sso-session sso-session]
sso_region = us-west-2
sso_start_url = https://flowwest.awsapps.com/start/
With this done you can run the following to login
aws sso login --profile flowwestThis will spawn a browser, confirm the code and you are done! You should now be able to run the following:
aws s3 ls2020-06-25 13:22:07 acfcwd-rain-strip-digitization
2020-06-25 13:51:45 alameda-flood-control-data-conversion
2020-06-25 14:40:05 ardenwood-creek-application
2021-05-27 13:25:35 bvr-fishkill-data
2019-08-02 10:16:51 bvr-wq-app
................
There are many useful things we can do with the CLI, and of course its not limited to S3. One thing you can do at this point is download an entire bucket, for example:
aws s3 sync s3://acfcwd-rain-strip-digitization local-folderwill download all the contents of the bucket acfcwd-rain-strip-digitization into the folder “local-folder”.
Connecting S3 to R for Data Versioning
In the final section of this guide, we will explore how to use the pins package in R (also available in Python) to establish a data store backend for our data analysis projects. This approach is particularly useful when dealing with datasets larger than the 50MB limit imposed by GitHub uploads. In these scenarios, we’ll use this S3 backend to easily integrate large data into our projects.
Install Dependencies
First we will need to install the pins package in R with
install.packages("paws")
install.packages("pins")
Set up
The creating an S3 storage backend is very easy at this point, you just need to make sure you have the required access keys as we did in the section: Granting Cyberduck Access
In code it will look like this.
# load in library
library("pins")

bvr_project_board <- pins::board_s3(
  bucket="bvr-fishkill-data",
  access_key="ASIA3JTOPWPMWVHHEDNO",
  secret_access_key="zPQha454loE6Okpjk1T2SrPoJP1qAuT033ilqMhp",
  session_token="fdjsaklj5k2347589034ujkfjdf49u5934jojgf0234jkrejgklsdfjg"
)

print(bvr_project_board)
# Pin board <pins_board_s3>
# Cache size: 0

# add new data to board
bvr_project_board |> pins::pin_write(mtcars)
# Using `name = 'mtcars'`
# Guessing `type = 'rds'`
# Creating new version '20240617T052401Z-ed15b'
# Writing to pin 'mtcars'

loaded_data <- bvr_project_board |> pins::pin_read("mtcars")